
 (0)
(0) (0)
(0)
 Antwoord met Citaat
Helaas ben ik niet zo handig, dus ik moest naar de garage om een raammechanisme te laten vervangen........ook rechts trouwens.
Dat waren toch weer flink wat euri's....
Ronald.
Resultaten 1 tot 20 van de 23
Onderwerp: raammechanisme defect
-
23-06-09, 09:36 #1

- Sinds
- 06 2009
- Leeftijd
- 61
- Posts
- 3
- Kudos
- 0


 raammechanisme defect
Ik heb bij mijn rechter voorrraam (electrisch 2004) een kabeldefect gehad.Dit uit zich in een knarsend geluid,het raam stopt op de helft en gaat weer naar beneden.(motor moet te hard trekken)
Heb de deurbekleding verwijderd,vergeet de kruiskop onderzijde handvat niet.Bovenste
helft deurrubber moet er af(kun je redelijk makkelijk terugduwen).Vergeet ook de grote torx aan de kopse kant boven het slot niet(zit achter een rubber dop).Als je de kabels en de spiegel hebt verwijderd kun je de bovenste deurhelft incl.raam verwijderen(rechtstandig omhoog trekken).Het hele mechanisme moet vervangen worden(kabels verrot),dit wijst zich eigenlijk vanzelf, kan maar op 1 manier bevestigd worden.Het koste mij vrij veel tijd omdat je alles moet uitzoeken.Het inbouwen duurde ong. 3 uur.
-
25-06-09, 06:59 #2

- Sinds
- 09 2006
- Posts
- 598
- Kudos
- 1
- Auto
- Audi S6
-
25-06-09, 07:29 #3

- Sinds
- 04 2008
- Leeftijd
- 51
- Posts
- 3.303
- Kudos
- 26
- Auto
- Audi A6
- Land

-
25-06-09, 15:50 #4
-
25-09-09, 14:12 #5
- Sinds
- 08 2009
- Leeftijd
- 14
- Posts
- 3
- Kudos
- 0
-
10-07-11, 18:12 #6
- Sinds
- 03 2009
- Posts
- 6
- Kudos
- 0
Re: raammechanisme defect
Beste allemaal,
een oude post, maar toch nog even een reactie van mij. Recentelijk heeft ook mijn raammechanisme het begeven. Heb een nieuwe gekocht. Op dit forum wat gezocht naar de HOWTO. Uiteindelijk ben ik uitgekomen op een engelstalige DIY. Hier helemaal beschreven wat je moet doen. Ben redelijk handig en was met twee uur klaar.
Zie hier de link: http://www.audizine.com/forum/showth...or-Replacement
Succes aan allen die ook het raammechanisme moeten vervangen. Voor mij de volgende keer weer zelf doen en zal me denk ik een dik uur kosten.
Hulde aan de originele poster.!
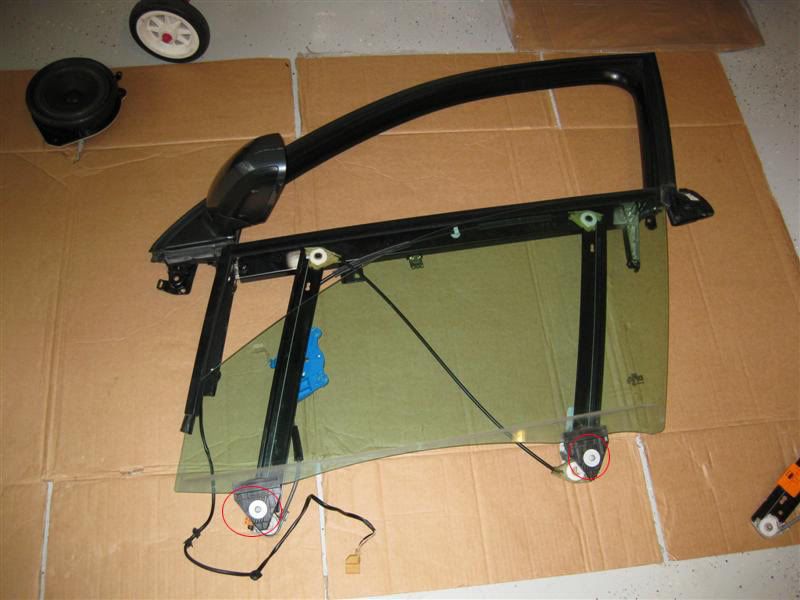
DIY: B6 A4 - Window Regulator & Motor Replacement
This is a DIY on how you to replace it with a new one, if you need to replace the window motor you can use this, it's actually a lot easier and less steps.
Lets begin with the tools you will need.
1 Philips head screwdriver
1 Flat head screwdriver for prying, I put tape on mine to help prevent scratching.
1 Ratchet wrench. I used a nice long extension piece too. You don't need the ratchet the whole time. You only need it to break the seal of the screws or the last half turn when tightening. The extension works nice to keep from banging into things with the handle your hand and is nice to use without the ratchet like a screwdriver.
1 #25 Torx bit.
1 #30 Torx bit.
1 #45 Torx bit.
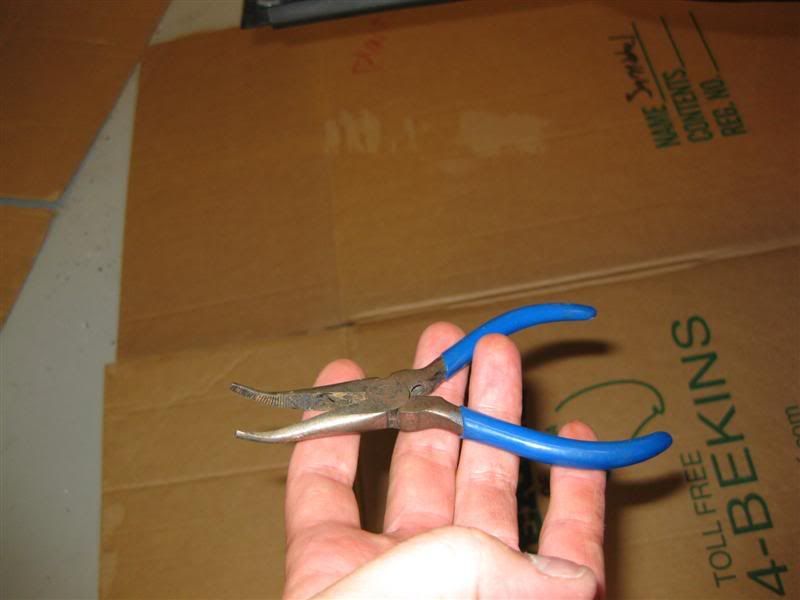
A pair of needle nose pliers will come in handy as well.
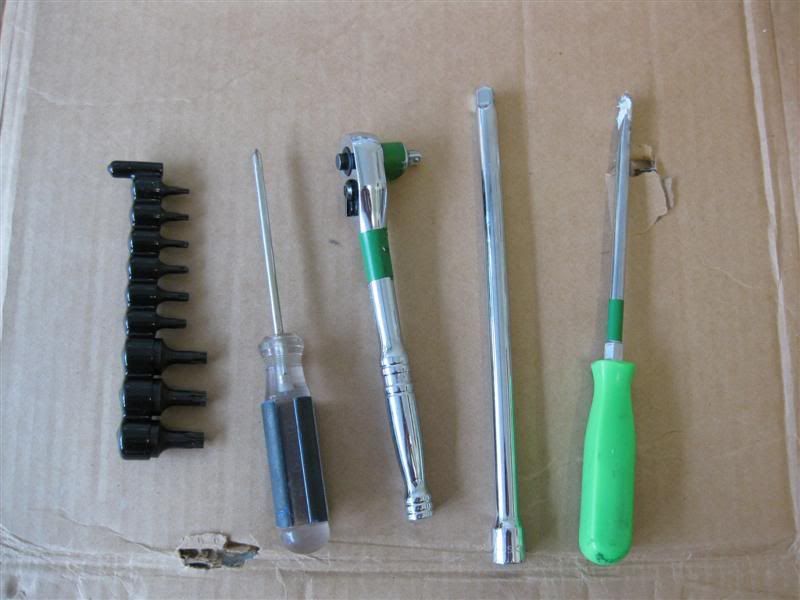
Having a stool or something will save your back and knees too.
Now lets take this door apart.
First, roll down the window all the way down.
If you're window reg is really jammed up try to help it down with your hand. It doesn't have to go back up till you replace it with the new one, if you're doing the motor it doesn't matter if it's up or down.
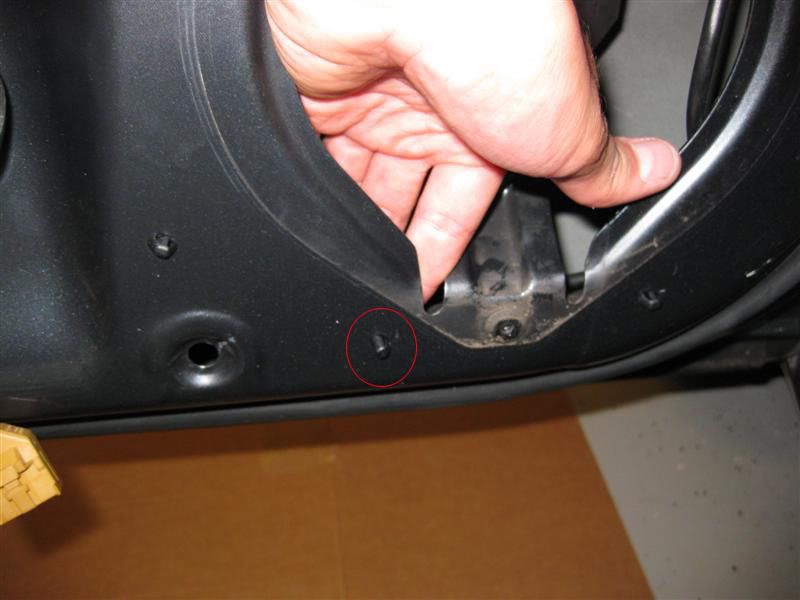
Now we're going to take the trim off the door and the small cap behind the handle.
There is one Philips head screw at bottom center of the door as well.

The screw at the bottom is pretty long and can be a pain, be patient with it and don't strip out the head.
As far as removing the upper trim, I used my fingers, I started in the middle near the door handle and worked my way to the door hinge. All of the clips pull straight out, except the on at the end of the trim closest to the open part of the door, that clip should be done last and pull the trim towards the door hinge.
Here is the back of the trim piece.

Here is what 5 normal clips look like.
Here is the one clip closest to the open part of th door, as you can see it can't be pulled straight out.

The cap under the handle just use a flat head from the underside and it will pop right off.
Now with the trim and cap off you have 4 Philips head brass colored screws exposed and 2 of the same screws behind where the cap was. Remove them. This is where a needle nose or magnetic screwdriver will help with the 2 behind the cap.
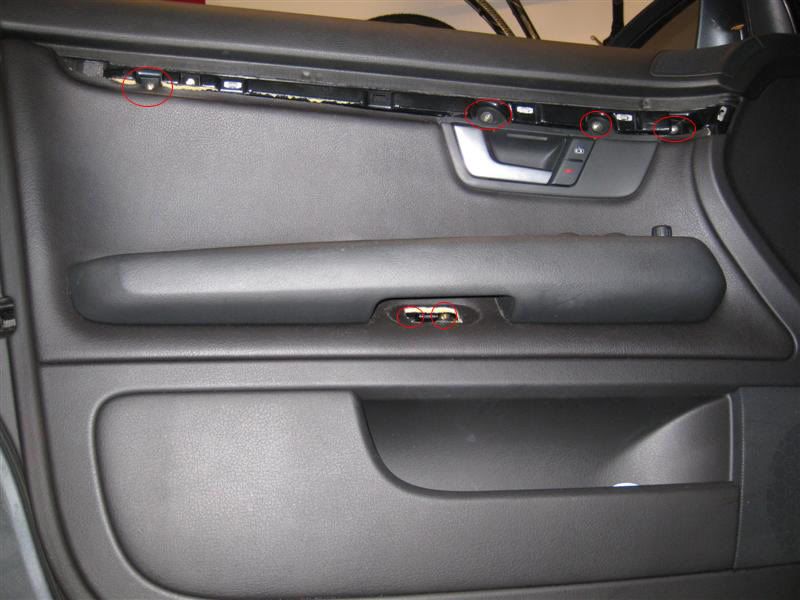
Now with those 6 screws and the 1 at the bottom center removed the door interior is ready to pull off. Start at the bottom and gentle pull to get the clips behind to come loose. The door interior will stay attached by the top. You will have to lift it to get it completely separated from the door but it won't just drop off until you lift it off.
The door is going to be attached from behind by the door handle mechanism and 2 wires at the bottom near the speaker so don't just yank it off expecting it to be free from the door completely yet.
Once lifted away from the door detach the door mechanism and wire clips, one on the speaker, one on the window motor. The one on the window motor has a purple clip that you can just press down with a flat head, it will swing down and back releasing the connection.

Now lay the door interior somewhere safe it won't get scratched.
The inner door is now exposed somewhat.
Now get our your #25 Torx.
I like to take all the #25's off now you can so you're not switching back and forth with different bits.
Now unclip the other other connection on the speaker and the other 3 connections on the Window Motor.
There are 3 black #25 Torx screws around the speaker and 3 silver #25 Torx on the Window Motor. There is also a clip holding a wire on top of the speaker that needs to be removed. I found it easier to undo the tape holding the wire to the clip then pulling the clip itself.
When you remove the screws from both parts, neither part will fall off. The Window Motor will need to be pulled off and if that is all you are replacing, do so, and reverse the steps from here and you are done.
The speaker has a small platic hanger at the top center, after the screws are out it will need to be lifted and pulled off to come free.

Now with window motor and speaker removed, time to remove the glued on sound deadening material. Just start at a corner and slowly, gently work it along the glue lines try not to rip and destroy it. It helps if it's warm when you're doing this, you can use a hair drier to help warm it up if needed. If you do it right all the glue will come off with the deadening material and not stay on the door.
When it's off lay it somewhere safe glue side up.
Check to make sure this clip is still intact and in the correct position.

Now there are still 2 more #25 Torx screws to remove now.
One is in the speaker well where you just removed the speaker. It's a black screw at the bottom of the old Window Regulator. The other is to the left of it about same height and is now uncovered with the sound deadening removed. Remove both screws.
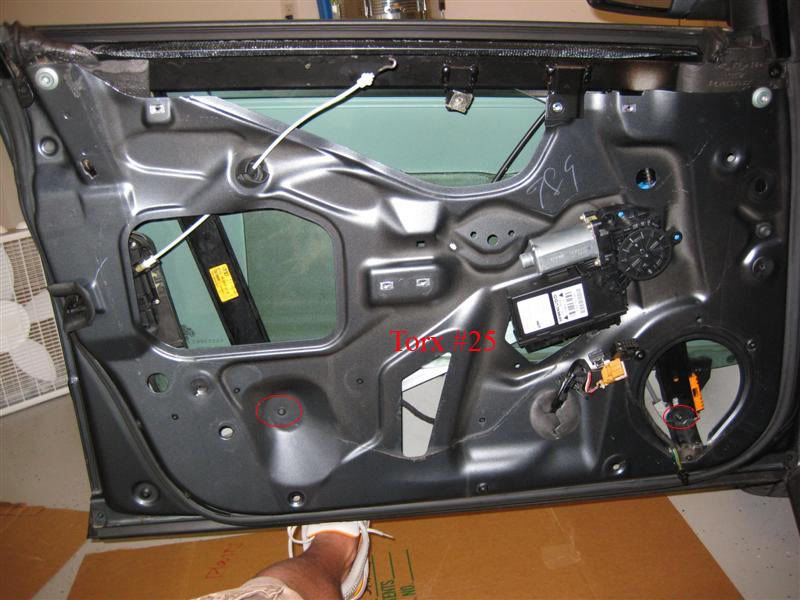
Now you are done with Torx #25 screws till the re-assemble.
Now you have to remove the power mirror wire from the clips on the inside lower part of the door so it can come out freely when you pull the door apart.
This is the Brown wiring harness that you disconnected from the Window Motor. Pull the big rubber plug out of the door that all the wires are coming through and disconnect the plastic wire tie holding them all togther. Needle nose will help.

Now there are 3 clips holding this wire on the INSIDE of the door you have disconnect. One is black and you can release the clip easily. The other two are white and you can reach them from inside the speaker well.
Here is the black one you can release easily.
Here is a pic inside the speaker well, you can see the lower white clip, the second is higher and approximated.
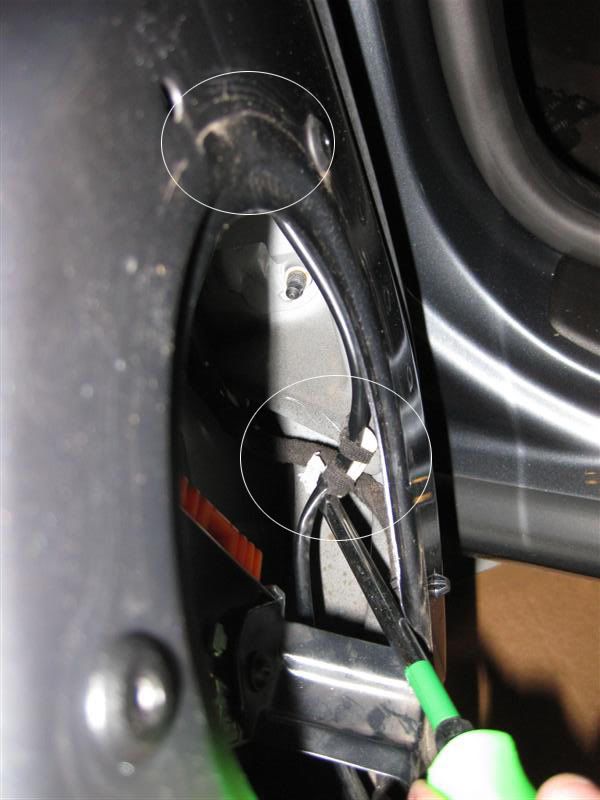
It's up to you to pull out those white clips or just undo the tape. I pulled the lower and undid the tape on the higher one.
Now with that wire loose, pull it through and let it hang out of the speaker well.

Now we're going to pull the remaining plastic pieces near the mirror. They're just clipped in, I started at the bottom with a flat head till I could get my fingers under it and just worked my way up for the big piece, it has 3 clips holding it. I started from the side with the small piece it has one clip and wedges into to the bottom.

Now we're ready to take some more screws out.
Now we're gunna take the one and only #30 Torx screw out that was behind that plastic you just removed by the side mirror. It is the lower black one. Do not remove the upper silver screw.

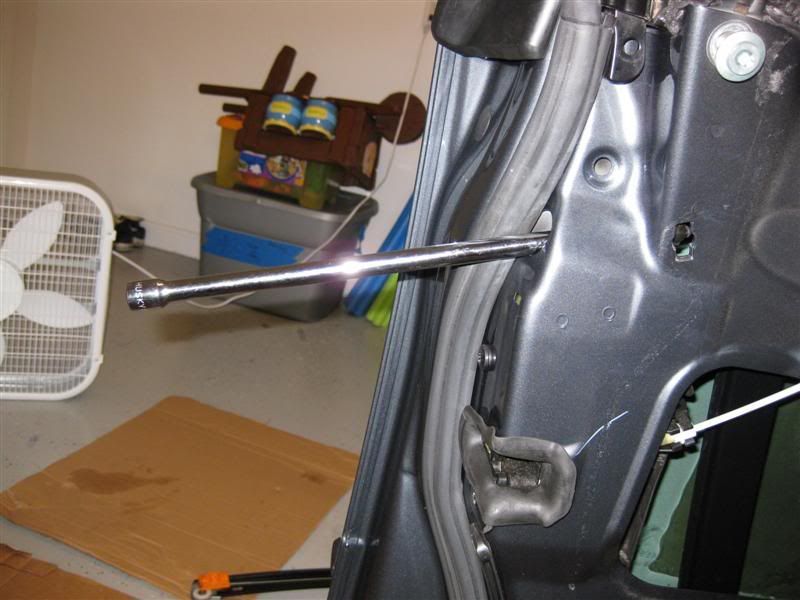
Ok now on to the last 4 screws and they are all #45 Torx 2 silver 2 black. 3 of them are right there on the door easy to spot, one is on the open edge of the door hidden behind a rubber cap.
Lets take the one out behind the cap first.
Remove the rubber cap and remove the screw. Don't worry about dropping it inside the door. There is no where for it to drop to. It will just stay there. A magnetic bit or needle nose and a long extension will really help here.
Cap

Screw
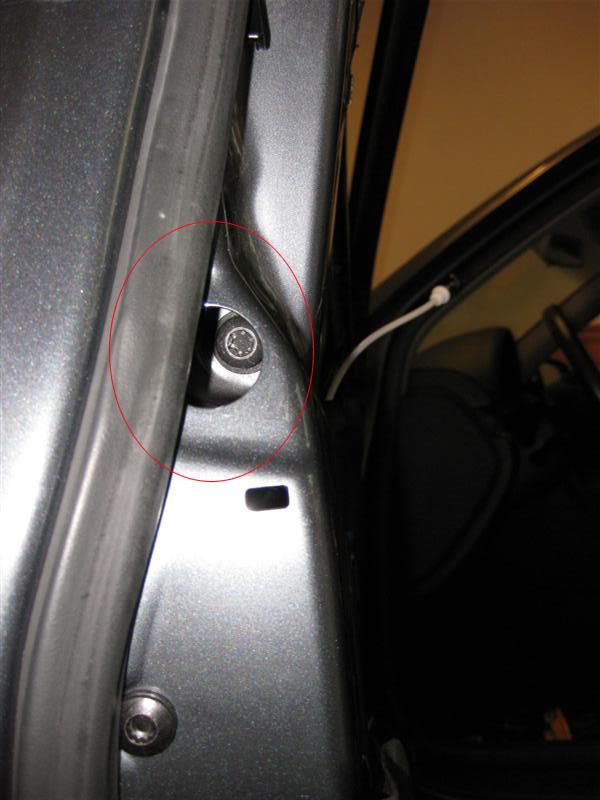
This is the angle you're gunna be at unscrewing it and replacing it, extension of some length is a must.
Now with that out, lets take out the other #45 Torx screws that are easy to get to. 1 black screw and 2 silvers left.

Now all the scewes are out. Time to remove the weather stripping around the top part of the door ONLY!
Be careful with this. I ripped mine a little but some glue fixed it. Pull from behind the stripping, not underneath.
I started from hinged part.
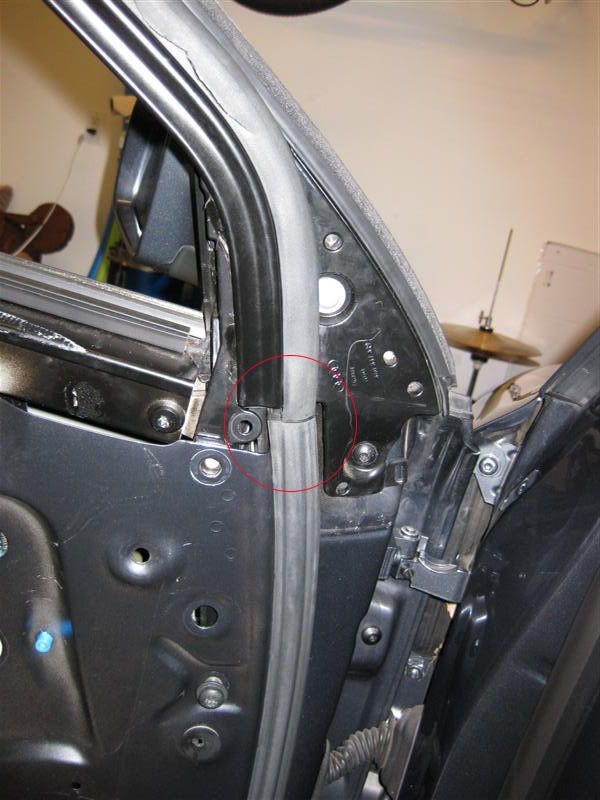
Do not remove it past those lines.
Get your fingers behind the rubber from the top of the door and work your way around slowly.
When you're done it will look like this.
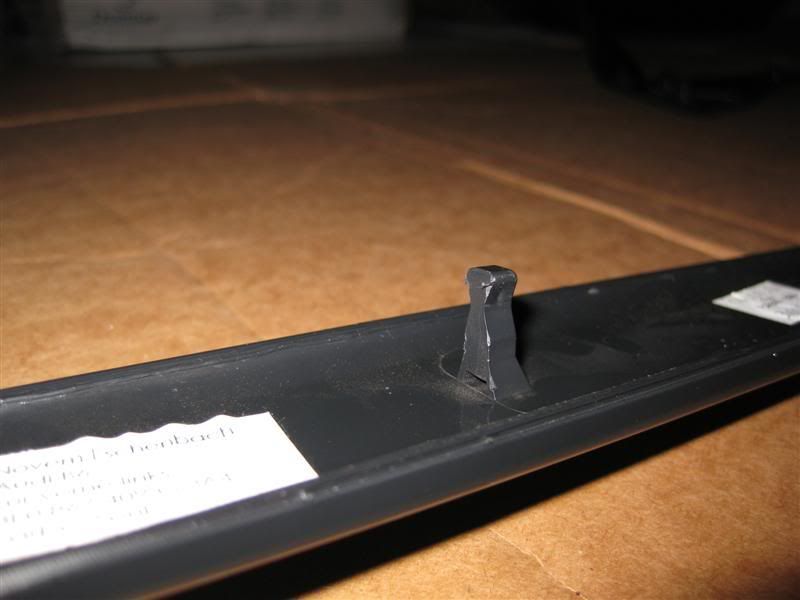
Now on the open part of the door there is one rubber cap to remove.
You want to get the 2 clips behind it to come out of the lower half of the door but stay attached to the upper half.

Now the last step before separating the door. Just squeeze the blue plastic stems of the Window Regulator where the Window Motor was attached and push them into the door.

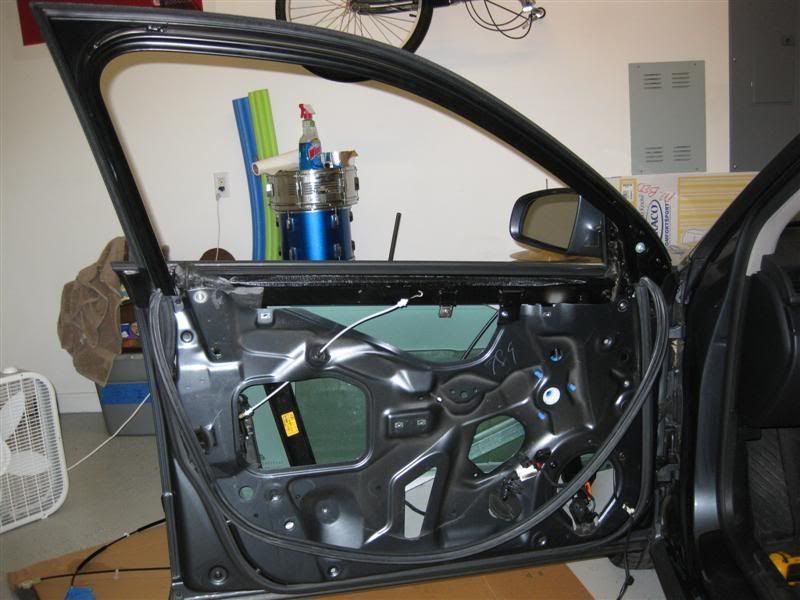
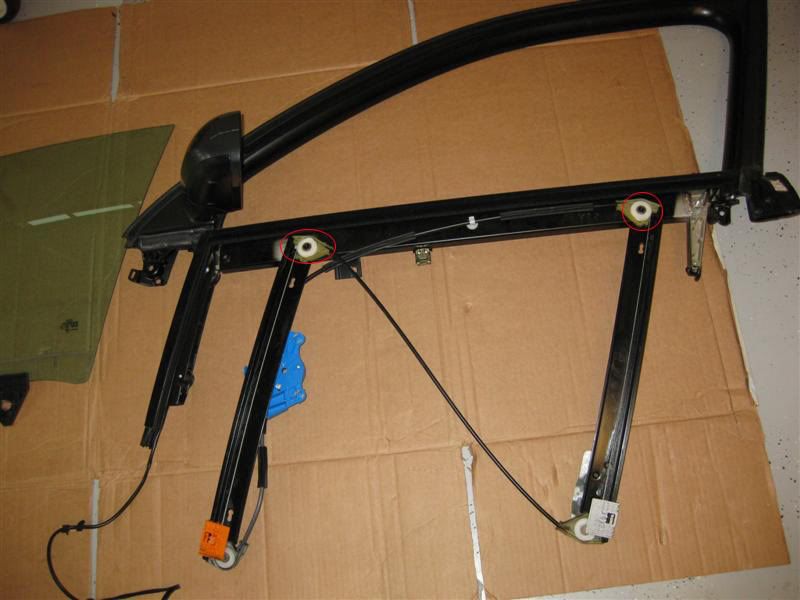
Now you're ready to live the top half off the door off. The whole window assembly will life out. The top frame, Window Regulator and Glass. Have somewhere close by, clean and safe to lay this down.
You're going to be laying it down mirror side up.
When lifting remember the glass and Window Regulator are slightly curved so it won't lift straight up, just get a good grip and lift slowly and don't force it, let it come out how it wants to.
REMEMBER THE POWER MIRROR WIRE. That has to come up with the mirror so make sure it's not caught anywhere.
When you get it separated you have this.
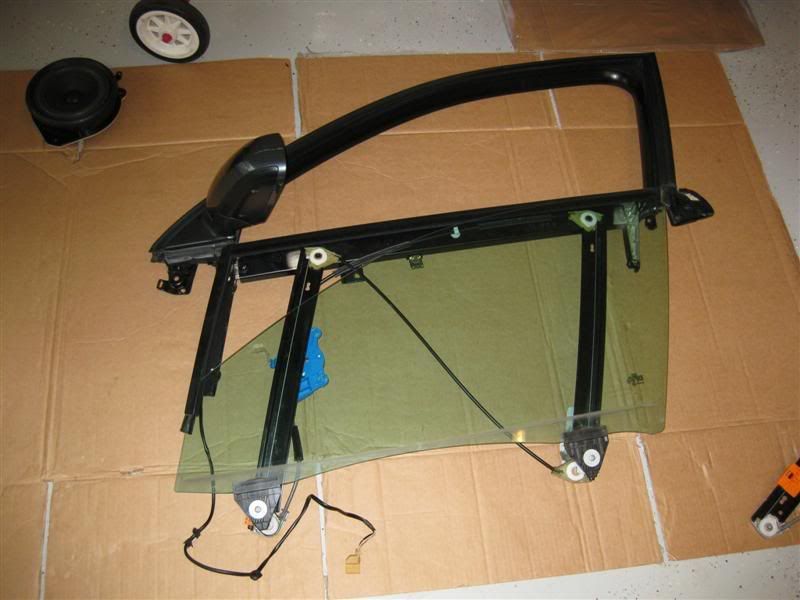
Remember when I said you were done with the #25 Torx bit? Well I lied, get it back out. 4 more to go.
Ok now you're gunna take the 2 #25 Torx out of the bottom of the Window Regulator but leaving the plastic tabs on the actual glass.
Pull the window out to get this.
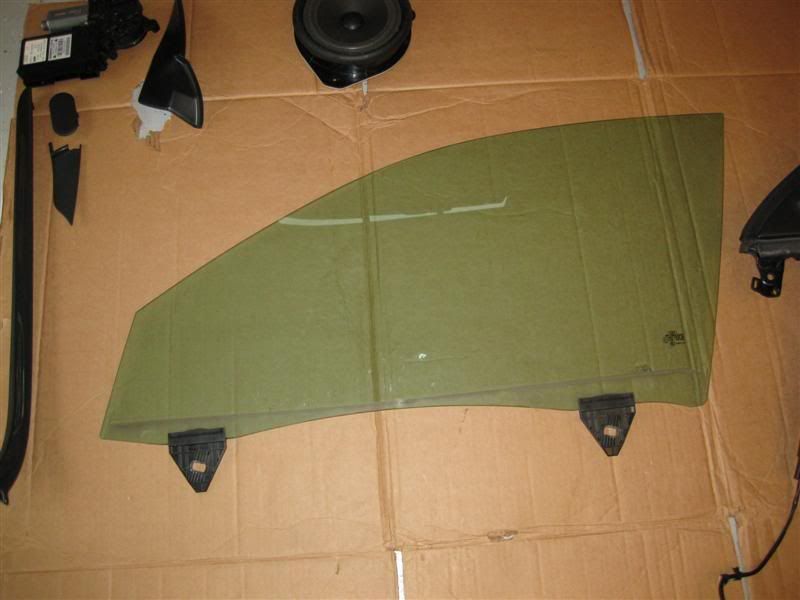
Now lay the new Window Regulator out next the old one that's still attached to make sure you have it all ready to go on the correct way.

Now remove the 2 #25 Torx screws at the top of the old Window Regulator.
Alright, now just put the new one into place and put the top 2 screws in.
Then slide the window into the frame and line up the bottom tabs. This is the most annoying part, getting the window in. It's easy with someone to give a helping hand which I didn't have but with a little patients it'll go in and line up.
Now screw the 2 lower #25 torx screws in to attach the window to the Regulator.
From here just reverse the steps.
I like to get the window in attach the 2 #25 torx screws at the bottom of the Window Regulator first and get the blue stems popped through that the Window Motor will screw into.
REMEMBER WHAT SCREWS GO ON UNDER THE SOUND DEADENING. The Window Motor goes on after the deadening material.
Hope all worked out for you.
-
13-07-11, 06:23 #7
-
13-07-11, 10:34 #8 Re: raammechanisme defect
Ook ik heb het gehad. Met beide ramen (bestuurders raam en passagiers raam). Is een VAG kwaaltje. Ik hoor het overal. Bij mij heeft een vriend beide ramen gerepareerd voor 350 euro te samen. Ik geloof, maar weet het niet zeker, dat een nieuw raam mechanisme tussen de 100 en de 150 euro's kost?
-
19-07-11, 15:25 #9 Re: raammechanisme defect
Net even bij de dealer geweest voor het onderdeel: 112,- euro excl. de BTW ... ff slikken dus. Vond op het internet van Valeo hetzelfde opnderdeel: http://www.mister-auto.nl/fl/glijblo...021850596.html voor 68.18 ... Dat is nogal een verschil! Denk dat ik die maar ga bestellen.
EDIT: besteld, kwamen nog wel 9,99 verzendkosten bij, maar dat boeit mij niet.
-
20-07-11, 06:55 #10
- Sinds
- 10 2010
- Leeftijd
- 36
- Posts
- 1.078
- Kudos
- 0
- Auto
- Audi A4
- Land
-
20-07-11, 08:29 #11
-
20-07-11, 09:29 #12 Re: raammechanisme defect
Slecht nieuws:
Bij deze informeren wij u dat na navraag bij onze leverancier helaas is gebleken dat het glijblok van VALEO niet meer op voorraad is en voorlopig ook niet meer op voorraad zal komen. Wij zullen het door u betaalde bedrag van 78,17 dan ook terugstorten op uw rekening. Onze excuses voor het ongemak.
Dan alsnog maar naar de stealer en mijn portemonnee omkeren
-
20-07-11, 11:45 #13
- Sinds
- 10 2010
- Leeftijd
- 36
- Posts
- 1.078
- Kudos
- 0
- Auto
- Audi A4
- Land
Re: raammechanisme defect
Ik weet niet waar je woont, maar als je in de buurt van Eindhoven of zuidelijker woont kun je eens kijken bij de Heuts. Ik heb daar de mechanismes voor 82,00 ongeveer gekocht (via een garage van een vriend, dus BTW werd daar afgetrokken en niet doorberekend aan mij). Dus dat is zo'n 100,00 inclusief btw. Altijd nog goedkoper dan de dealer waar ze volgens mij rond de 115 exclusief kost.
-
20-07-11, 12:08 #14
-
22-07-11, 09:26 #15

- Sinds
- 04 2007
- Posts
- 658
- Kudos
- 1
- Auto
- Audi S4
Re: raammechanisme defect
ik heb hetzelfde probleem gehad. alleen de kabel was verrot, maar het hele raammechanisme moest worden vervangen. heel irritant zeker als je raam blijft hangen tijdens een hoosbui. langs de dealer gereden en het zou me 268 eu kosten. een week later waren de onderdelen er nog niet, iemand was vergeten de bestelling te plaatsen en en passent werd me verteld dat de prijs toch ex btw is, maw 318 eu. ik heb direct de reparatie geannuleerd en op marktplaats voor 50 eu een 2e hands raammechanisme gekocht en voor nog geen 100 eu in laten bouwen. loont toch weer!
@ A-tje even goed zoeken op ebay, mp of sloop. ik zag ze ook bij bm-onderdelenshop liggen.
succes!
-
22-07-11, 12:26 #16 Re: raammechanisme defect
Thanks for the tip, maar ik haal (heel eigenwijs, ik weet het) het onderdeel bij de dealer. Ik heb geen zin in een raammechanisme waarbij hetzelfde probleem zich ook weer snel voor kan doen omdat het een gebruikte is. Ga dan liever voor nieuw

-
22-07-11, 15:30 #17
-
28-07-11, 18:37 #18
-
03-07-12, 11:55 #19
- Sinds
- 03 2009
- Posts
- 6
- Kudos
- 0
Re: raammechanisme defect
Voor prijzen kijk ik altijd even naar http://www.wwsmit.nl/onderdelen/prijzen.html
Heb je ongeveer een indicatie.
-
24-08-12, 10:54 #20
- Sinds
- 08 2012
- Posts
- 1
- Kudos
- 0
- Auto
- Audi A4
Re: raammechanisme defect
Of hier kijken
http://www.vosparts.nl/
 Audi A6 3.0 TDi Quattro S-line
 Oud (2009-2014) Audi A6 2.5 TDi Quattro
 Oud (2014-2017) Audi A6 3.0 TDi Quattro Pro-line


 Audi A4 B6

 Audi A4 avant

 Audi A4 B7 1.8T limousine
 Audi S4 4.2 V8 Avant - handgeschakeld